Tuesday, December 06, 2005

A Blogging hiatus


Dear Reader, this will be my last post from Pittsburgh. My fridge-cleanup effort has been successfully completed.

My blog is alive but there will be no updates until after we complete our move to the Silicon Valley and settle down in our home with Internet access, of course (which can take at least a month, gulp). To all my blog friends- I will miss reading your posts very much. I will read your posts soon in sunny California!

Saturday, December 03, 2005

Vegetarian Paella


I love the taste of restaurant paella, even though vegetarian versions are not authentic. But at home, it always falls short of my expectations until today. This recipe does not leave you with enough leftovers for a week. I usually use just normal long grain rice for paella but using short grain style rice, arborio like I did today gives a nice chewy texture to the dish. I usually crank up the heat to saute up the sofrito. But long, slow sauteeing for 15-20 min improved the flavor remarkably this time. Overall, it was very satisfying to eat a home cooked paella. Now that I have made a nice, tasty paella, maybe I will buy the neat paella pans next...

1 cup arborio rice or spanish short-grain rice
1 large onion, finely chopped
5-6 cloves garlic, chopped
1/2 tsp sazon blend (optional) or dried thyme
1/2 tsp dried parsley
1 green pepper, finely diced
2-3 medium tomatoes, finely chopped
1 zucchini, diced
1/2 cup red wine
1/2 cup peas
1 tsp smoked paprika (I used ancho chile powder)
1 tsp saffron
2-2.5 cups vegetable broth, warmed
6 artichoke hearts, sliced into halves
1 red pepper, roasted, peeled and cut into strips
salt
lemon wedges

1. Heat 2-3 tsp olive oil in a large skillet, add onion, garlic and green pepper and saute until softened, 2-3 min. Turn down heat to medium-low, add herbs and tomatoes and saute for as long as 15-20 min till very soft and slightly caramelized.
2. Soak saffron in warm broth.
3. When the sofrito is done, add zucchini and rice. Saute for 1 min. Add wine and let it evaporate. Pour in the broth, add salt, paprika. Some recipes don't suggest covering and let the paella cook in the oven. I cover the pan and cook on stovetop.
4. Add peas half-way through. After the rice cooks completely, remove cover. Place artichokes and roasted pepper strips decoratively on top. Let the bottom of rice caramelize a little.
5. Serve warm with lemon wedges.

Thursday, December 01, 2005

Fridge clean-up: Chocolate mayonnaise cake


I am working against time to use up the odds and ends in my refrigerator before we move next week. This nice, everyday cake used up the mayo in the fridge. It is even better the next day, quite chocolaty for a cocoa powder based cake. I split the cake horizontally and sandwiched it with raspberry jam (lots of it). The jam did improve the taste phenomenally.

Chocolate mayonnaise cake

1 cup sugar
1 cup full-fat mayonnaise
1 teaspoon vanilla extract
2 cups cake flour
1/2 cup Dutch process cocoa
1 1/2 teaspoons baking soda
1/4 teaspoon salt
1 cup buttermilk

Oven 350 degrees. Beat the sugar and mayonnaise until blended. Add the vanilla and blend. Sift together the flour, cocoa, baking soda and salt and add it to the mayonnaise mixture in 3 batches alternating with the buttermilk. Pour into a greased and floured 9 by 9 by 2-inch baking pan. Bake for 45 to 50 minutes. Let cool on a wire rack.

Microwave Plantain chips


Microwave potato chips are catching on in the Blogging world, thanks to Uncle Bill and Nic. It seems to be already getting ahead of self-frosting cupcakes. I tried it with idaho potatoes and in my first attempt I did burn most of the slices. I guess the trick, if any, is in the even slicing. I love plantain chips and tried making it in the microwave. It worked! I thinly sliced the plantains by hand, tossed them with some salt, chili powder and 1 tsp oil. Then they took around 3 min in the microwave. The extra oil is optional but since plantains are very dry inside, I liked the addition of oil.

Tuesday, November 29, 2005

Vermicilli idli


This is India's favorite pasta, just like the Italian vermicelli but in small bits. It is called semiya in Tamil and we use it mostly for kheer or payasam, like Nupur's delicious one here. Some less known uses for it is in upma and also in making spiced idlis. Think vermicilli bound by rava idli batter and flavored with nuts and curry leaves and green chilies. That is semiya or vermicelli idli. No fermentation is required because of the addition of yogurt and baking powder. If the yogurt is sour, I like to eliminate baking powder also.

Vermicilli idlis

Vermicilli – 1 ½ cups
Semolina- ¾ cup
Ghee- 2 tsp
Oil-3tbsp
Fresh yogurt- 2 cups
Water-approx 1/2 cup or less
Chopped green chillies- 1 tsp
Cumin seeds-1tsp
Asafoetida powder- 1 tsp (optional)
chana dal- 1 tsp
Curry leaves- a handful
Chopped cilantro-2tbsp
broken cashew- 3 tbsp
Baking powder- ½ tsp
salt as required

Fry the vermicilli and the semolina separately in the ghee to a light golden colour. Take away and let them to cool in a bowl. Heat oil. Add the cashew, cumin seeds, chana dal and asafoetida and fry for a few seconds until cashew is golden brown. Add the green chilli and curry leaves and fry for a few minutes. Add this to the vermicilli mixture. Add the beaten yogurt, cilantro and the baking powder with the water and enough salt. Mix well. You should have a batter with a rice idli consisitency. Keep this mixture covered for 15-20 minutes, then mix well and pour the batter into greased idli moulds. Steam them for about 12 min until tester comes clean.

Monday, November 28, 2005

Fridge clean-up: Maple blueberry whole-wheat braid


We will be relocating soon to California and moving out of this apartment that has been our home for six years. When you have lived for too long in a place, things pile up. My freezer has a huge stash of stuff that has to be used before we leave in a week or two. One such gem I found hidden in our freezer was some organic blueberries. I had to use them for this bread from the Bread Bible. This way I also used up the maple syrup can that was lying around in the fridge.


I was apprehensive about making bread from the book because of some bad reviews. But Nic, of Baking Sheet tested out a Cinnamon swirl bread from this book and it looked great on her blog. I am, by no means, as good as her in terms of baking. But my confidence in the book was renewed and I made two huge braids last weekend. It is a half-day affair. But the taste of the end product was great.

The recipe I made was the one in the book and since the link has the bread machine version, the proportions for the dough are different.

Whole wheat sweet yeast dough for mixing by hand

1 cup warm milk
1/4 cup warm water
pinch sugar
pinch of ground ginger
6 tablespoons unsalted butter, melted
1/3 cup maple syrup
2 large eggs
Grated zest of 1 lemon
2 cups whole-wheat flour
2 1/2 to 3 cups all-purpose flour
2 teaspoons salt
1 1/2 Tbsp instant yeast

Mix and knead as for a normal bread dough.


Make sure to have friends around for sharing because the bottom gets soggy if it lies around for more than two days. The bread is almost like a blueberry cobbler but with a lot of bread around. It is not too sweet even with so much maple syrup in it. It is great for breakfast.

Saturday, November 26, 2005

SHF/IMBB- Holiday cookie swap

Making cookies is a lovely tradition and I do it every year with my friends. Exchanging family cookie recipes along with some great pictures is exciting and this is what this SHF/IMBB is about. It is hosted by none other than the Domestic goddess, Jennifer and Alberto of Il Forno. From these creators of SHF and IMBB, this is a super-duper bloggers event.

My family does not share the cookie-making tradition since most families in India do not own an oven. I grew up on bakery cookies and packaged biscuits, most of them are eggless, catering to the predominantly vegetarian population. For this SHF, I recreated some of my childhood favorites.


cardamom sandwich cookies

Cardamom cream sandwich cookies- I love True Elaichi biscuits. This homemade version is based on Gale Gand's recipe. It has ground cardamom and some crushed saffron in the dough. The cream filling made with butter, powdered sugar and milk has ground cardamom and I also added a drop or two of cardamom extract from India. Truly exotic and I will have to make more for swapping.


macaroons

Coconut macaroons- A common macaroon recipe that I baked to a perfect golden brown as those I get from Indian bakeries (not just pale on the edges). It is crispy on the outside and chewy inside.


'Nice' biscuits

Faux Nice biscuits- Nice biscuits are perfect for eating on their own or dunking in coffee. They have a lot of coconut and a crisp sugar sprinkle on top. This recipe tastes exactly the same though in a different shape.

80 gm Flour
40 gm Butter
1/4 tsp Baking powder
50 gm Powder sugar
40 gm unsweetend Desiccated coconut
about 4 T Water/Milk (this recipe has only approximate measurements to form a soft dough)
1/2 tsp Vanilla extract
1/4 tsp coconut extract (optional)
Coarse sugar for sprinkling

Sieve/sift flour and baking powder. Cream butter and sugar. Add flour and desiccated coconut, extracts and make a soft dough with milk/water. Roll into a cylinder and further roll the dough into a square butter paper. Chill it for 4-5 hours or till hard (Do not freeze). Bake at 350 F for 15 mins or till dark golden.

Tuesday, November 22, 2005

Pumpkin roll


This is a delicious and relatively low-fat pumpkin roll baked for a friend. The recipe is from cooking light and can also be found here. There is no need to beat egg whites separately, a big plus IMO. The cream cheese filling and spices in the cake remind me of carrot cake. The pecans on top give a great crunch.

Monday, November 21, 2005

Roasted soy beans


I recently purchased a huge frozen pack of soybeans for a bargain at Lotus, in the strip district. I wanted to experiment with the bean and try making roasted salted soybeans. The Trader Joe's version of it is really delicious but we do not have it in Pittsburgh yet. So the experiment was very successful and I made an onion flavored version too. They make one tasty snack and salad topper too.

Blanch 2 cups or so of frozen beans in salted boiling water and let them cook till they are soft enough to eat but quite firm (no splitting skins). Spread them on paper towels and dry them completely. Mix the beans in a bowl with 1 tsp oil, sprinkling of salt, some paprika and any other flavoring (like dried herbs, onion powder, garlic powder etc). Spread them in a single layer on a baking sheet and bake at 450 F (stirring every 5 min) until they are dry, crisp and browned slightly. It took me 20 min or so to crisp them. They will crisp a little more on cooling.

Tongs from an Indian Kitchen


Idukki Posted by Picasa

Indira has come up with a wonderful idea to showcase utensils and ingredients from Indian Kitchens. This is my must-have tool in the kitchen- 'idukki' or tongs. I have a lot of pots and pans purchased in India that are stainless steel and most of them do not have heat-proof handles. This pair of worn-out tongs are of great help moving hot pans, especially in and out of the pressure cooker. They are very sturdy too. Many of my Indian friends have tried and tested ones that are handed down by their mothers or mothers-in-law.

Thursday, November 17, 2005

Blog party-Holiday edition


It is Stephanie's party and I am bringing some mushroom gratinate. It is one of those recipes that remind you of something else but yet you keep making it for its amazing taste. Could it be because it is Lidia Bastianich's recipe? It seems like a crostini with mushroom topping. But the longer baking time and lots of pressing makes it more like a mushroom pizza. I just used some button mushrooms. The best part is our 18 month old loved the topping (she does not like anything usually). Here are the mushroom fingers (as I like to call them) and my gal hanging around for the party to begin-).


Mushroom Gratinate
1 tbsp. extra-virgin olive oil
2 tbsp. butter
4 garlic cloves, finely chopped
2 1/2 lbs. mushrooms, cleaned and sliced
1 tsp. fresh rosemary, chopped
1 tsp. salt
1/2 cup freshly grated Parmigiano-Reggiano or Grana Padano

FOR THE BASE AND GRATIN
12 thick slices hearty wheat bread, lightly toasted
3 tbsp. soft butter
1/4 cup chopped parsley
1 cup freshly grated Parmigiano-Reggiano or Grana Padano


Preheat the oven to 375°.

Heat the olive oil in the skillet over medium heat and sauté the garlic, stirring, until it just begins to color. Add the butter and, when it melts, toss in the mushrooms, sprinkle on the thyme, sage, and salt, and cook, stirring now and then, until the water evaporates and the mushrooms start to caramelize. Remove from the heat, then stir in the grated cheese.

Lay the bread slices in one layer in the baking pan to cover the bottom completely. Spread the soft butter all over the bread and spoon the mushrooms evenly on top, pressing them down into the bread. Sprinkle the parsley on and top with grated cheese. Bake for 10 to 15 minutes until the cheese has browned and the edges of the bread are crisp. Let rest a few minutes, then cut into serving pieces. Makes 12 pieces.

I can never get myself interested in cocktails or mocktails. I leave it to friends to supply them. So this recipe for pomegranate martini comes from my friend S who loves making cocktails. I think the color of it would be beautiful and festive. Shake together 3 oz citrus-infused vodka and 3 oz of POM juice with some ice. Shake,shake, shake and pour into chilled glasses. Serves two.

Wednesday, November 16, 2005

Cauliflower biryani with soy beans


A whole lot of cauliflower has landed here in the market in the strip district. I had bought a huge head of it a week back and forgotten about it until Indira made her delicious aloo gobi. I am just as reluctant as her to buy cauliflower but S is fond of it. I like to literally drown cauliflower in spices to cancel out the off-flavor. This is one of the ways I make gobi, besides my usual cauliflower korma (very similar to Indira's recipe). I added some frozen soy beans instead of peas. I never liked the salted edamame that is sold soaked in brine or something. But I loved this frozen version of the bean. A great way to add some protein (and quite a bit of good fat too) to our not too balanced vegetarian diet.

Cauliflower biryani with soybeans

1 cup Basmati or long-grain rice, washed and soaked for 15 min
2 cups medium size cauliflower florets
1 large onion, sliced thin
1/2 cup - 3/4 cup fresh or frozen soy beans or peas
1/4 cup yogurt
1 tsp coriander-cumin powder
1 tsp red chili powder
1-2tsp garam masala or pulao masala powder
salt, to taste
a few mint leaves, finely chopped
cilantro, chopped
2 tsp oil or ghee

Spice mix:
1 tsp cumin seeds
1 bay leaf
1 inch cinnamon bark
4 green cardamom pods, crushed
2-3 cloves

Drain rice.
Heat oil/ghee. Add spice mix and saute till cumin seeds turn slightly golden. Add the onion and saute until wilted. Add cauliflower and saute until slightly softened. Add rice and saute for a minute. Add soybeans and 2.25 cups water. Once it comes to a boil, add yogurt, salt, chili powder, coriander-cumin powder, garam masala and mint. Cover pan tightly and cook till rice and vegetables are done. Fluff up rice and garnish with cilantro.

It goes well with boondi raita.

Friday, November 11, 2005

Mint chutney- South-Indian style


Most South-indian hotels serve a green mint chutney with dosas. It is nothing but a thinned down version of Mint thogaiyal. Making large batches of chutney requires enormous quantities of the main ingredient. Thogaiyal is a type of chutney. The addition of lentils and coconut gives a lot of volume, an excellent way for restaurants to save on expensive herbs.

While chutney is made with mostly fresh ingredients and is paste-like, thogaiyal involves some sauteeing of the ingredients and grinding them into a thick and coarse mass. The sauteeing step gives a richer flavor and also increases the life of the thogaiyal to about 5-7 days. Fresh chutneys can keep for a maximum of 2 days only.

Thogaiyal can be made with any sauteed vegetable. Most tamilians, make versions of this with coconut, lentils, broiled eggplant, cilantro, curry leaves or mint as the predominant flavoring.

Base for thogaiyal

4-5 red chilis
1 tsp mustard seeds
3 tsp urad dal (or 2 tsp urad dal + 1 tsp chana dal)
1/4 tsp whole peppercorns(optional)
1/4 tsp tamarind paste or 1 inch piece tamarind
2 T or more grated fresh or dessicated coconut (this is a good place to use dessicated coconut)
1 inch ginger, peeled and finely chopped(optional)
1-2 green chilis(optional)

Saute red chilis, mustard, pepper, tamarind pod (if using) and dal until golden brown. Add coconut and saute until coconut turns golden brown. Remove to a bowl. Add ginger and green chilis and saute until slightly toasted. Add this to the bowl.

One of the following main ingredient is to be added:
1 small bunch mint (or a mix of cilantro and mint), sauteed until wilted and dry.
1 small bunch cilantro, sauteed until wilted and dry.
1/2 cup curry leaves, sauteed until wilted and dry.
1 cup grated coconut (Coconut thogaiyal), saute along with base ingredients until golden.
1/2 cup tur dal (paruppu thogaiyal), saute along with base ingredients until golden.
1 large eggplant, broiled until soft and skins removed

Grind the base mixture with the main ingredient, tamarind paste(if using) and salt into a coarse, thick mass. Season with mustard seeds and urad dal.


This is a great way to get a larger quantity of chutney when herbs or coconut is limited. It is excellent with dosa, yogurt rice or with the humble kanji (porridge).


Thogaiyal with rice-green gram kanji  Posted by Picasa

Thursday, November 10, 2005

Stuffed red chili pickles


I saw small red cherry peppers in the farmers' market that screamed to be stuffed. This is my way of stuffing them- with lots of spices and pickling them in oil. This is a traditional pickle from Northern India made with long red chilis. I usually buy 'Mother's recipe' brand of this pickle from India. I am out of it and so this will be my substitute till my next trip to India (if it lasts so long). The Indian red chili is more fiery. Cherry peppers are very mild and so if you want it very spicy, you need to increase the red chili powder to suit your taste.

Stuffed red chili pickles

20 cherry peppers
1 cup oil
2 tbsps mustard seeds
3 tbsps cumin seeds
2 tbsps aniseed/fennelseeds
3-4 tbsp red chili powder or more to taste
1/4 cup coarse mustard powder (available in Indian store)
4 tbsps amchoor powder
about 8 tbsp salt, or more to taste
Juice of 3-5 limes
1 tsp asafoetida

Wash and thoroughly dry the chillies. Trim the stems. Remove the stem of chili and remove most of the seeds and membranes without breaking apart the chilies.

Roast cumin seeds, mustard seeds and aniseed/fennel seeds on a slow fire till mustard pops. Cool and grind very coarsely.

Mix this with the mustard powder, chili powder, raw mango powder and salt. Add just enough lime juice to this mix to make a thick paste. Taste the mixture before stuffing. It should be very salty, spicy and sour. Stuff each chilli well with the paste. Put the chillies in a dry, wide-mouthed glass pickling jar (the glass should be able to withstand hot tempratures).


Heat the oil (if you like the taste, mustard oil will be more authentic) in a pan and when very hot add the asafoetida and immediately turn off the fire. Pour the hot oil over the chillies in the jar. Keep jar open till oil cools. Seal the jar and keep it out in the sun for a week to ten days. In this wet and cold weather, this is not possible. So keep them in a cool place in your pantry. This just means that the chilis will take longer to marinate and soften. Shake gently each day to make sure the oil coats the chillies well.


It goes great with chappatis and parathas.

Wednesday, November 09, 2005

Eggplant subzi with dried wadi


Indian stores sell sun-dried lentil nuggets called wadi. They are delicious and they can turn even the most mundane vegetable into a spicier and special-tasting dish. There are two types of wadis that our local Indian grocer sells- one made with urad dal called punjabi wadi and the other is moong dal wadis that are smaller and less spicy. These wadis remind me of 'kuzhambu vadam' that my mom used to add to vathal kuzhambu as a flavoring agent and thickener.


wadi Posted by Picasa

I like to use the larger urad wadis and usually one or two large ones are enough for making a dish. Urad dal wadis contain coarsely broken dried chilis and peppercorns. Each bite sends a spice burst in your mouth. But when broken pieces are added to a subzi, they completely melt into it improving the overall flavor of the dish. All that needs to be done is to break the wadi coarsely and saute them in a tbsp of oil until golden brown. Then add the sauteed wadis along with the vegetable and cook till vegetable is done.

1 large eggplant
1-2 large Urad Dal Wadi, broken into medium to small pieces
oil
a pinch of Asafoetida
1 tsp mustard seeds
1 inch piece Ginger (finely chopped)
4-5 Green chillies (finely chopped)
1 tsp Turmeric powder
2 large Tomatoes (finely chopped)
Salt to taste
1 tbsp Garam masala powder

Finely chop eggplant. Keep in sufficient water to prevent discolouration.
Heat oil in pan. Add urad dal wadi broken in small pieces. Cook till golden brown. Drain and keep aside. In the same oil, add mustard seeds, asafoetida, ginger, green chillies and turmeric powder. Stir well briefly and add tomatoes. Cook till oil separates. Add drained brinjal pieces, fried wadi, salt to taste and garam masala powder. Cover and cook on low heat for about ten minutes till meltingly tender. Garnish with chopped cilantro.

Tuesday, November 08, 2005

Gingerbread with blueberries


It is gingerbread season already. This is a light recipe from Cooking light. I love using blueberries in gingerbread; they are even better here than in muffins. The blueberries are a nice contrast to the sweet bread. So if you have a frozen stash of blueberries, this is a seasonally attractive option.

Gingerbread

2 cups all-purpose flour
1/3 cup chopped crystallized ginger (this really makes it special)
1 1/2 teaspoons ground ginger
1 1/2 teaspoons ground cinnamon (or you can use 1 tsp ground allspice)
1 teaspoon baking powder
1 teaspoon baking soda
1/2 teaspoon salt
1/8 teaspoon ground cloves
3/4 cup buttermilk
1/2 cup brown sugar
1/2 cup molasses
1/4 cup apple cider or 1% low-fat milk
1/4 cup vegetable oil
2 large eggs
1 1/2 cups frozen or fresh blueberries

Preheat oven to 350°.

Toss berries with 2 tsp flour.
Combine remaining flour with all other ingredients through cloves in a large bowl, stirring well with a whisk; make a well in center of mixture.

Combine buttermilk through eggs; stir well with a whisk. Add buttermilk mixture to flour mixture, stirring just until moist. Fold in blueberries. Spoon batter into an 11 x 7-inch baking dish or 9-inch square baking pan coated with cooking spray. Bake at 350° for 45 minutes or until a wooden pick inserted in center of cake comes out clean. The cake is very moist 'coz of the berries. So it can stick to the pan.

It is better served from the pan with a dusting of powdered sugar.

Sunday, November 06, 2005

A shallow souffle with a height complex


This one was almost an entry for IMBB event that was hosted by Kitchen Chick last month. But these did not look like souffles that have huffed and puffed. So I had written up a post and ignored it. But when I was going through my posts today, I came across it. The idea of making a jalapeno souffle based on a bechamel sauce seemed a delicious idea. The dismal look of this souffle happened 'coz I tried to convert the recipe for 12 mini- muffin sized hors'doeuvres into two normal souffles in 4 oz ramekins. But this recipe just made enough for one generous souffle. Since I needed two individual servings, I decided to tempt fate and get on with it. The unbaked souffle batter came to about 1/3 rd of the ramekins, not a good sign at all. Anyway, they did rise to almost the top of the ramekins. I decided to post this anyway because the taste of these souffles are amazing and I think they would make great little bites too.

Friday, November 04, 2005

Quinoa with roasted root vegetables


I came across Quinoa in Jennifer's previous blog. After some research, I found that this was one protein-rich grain and has several health benefits. Quinoa has a resinous, soapy coating that is bitter. So it needs to be washed thoroughly. But the quinoa available in US, does not have the coating and so it takes much less rinsing. I like to rinse it once and roast till the grain makes popping noise (although this is not neccessary). The taste of toasted quinoa is much better and I love the chewiness of its white tail. We had it with roasted root vegetables that were drizzled with a touch of balsamic vinegar. Truly, a delicious and feel-good meal.

Thursday, November 03, 2005

Sugar cookies


In the spirit of Halloween, I made some sugar cookies. I wanted to try my hand at icing them in beautiful colors and decorate them to my heart's content. I have never had much success with cut-out cookies since many recipes I have tried in the past did not roll out well. The scraps were impossible to roll out even if they were chilled. I guess now I have found the right recipe. This recipe comes from Alton Brown and if you have seen his show Good Eats, you will know why his recipes can be trusted a great deal. It was with this faith that I used his recipe.


Needless to say, this is a beautiful dough. It rolls out well, without becoming sticky and soft. You can use the dough till the last ounce without any change in the cookies' texture. These cookies are buttery, slightly crisp and not too sweet (even when I increased the sugar by 1/4 cup). They tasted so great plain that we felt that icing it spoiled the flavor.

Alton's sugar cookies (adapted slightly)

3 cups all-purpose flour
3/4 teaspoon baking powder
1/4 teaspoon salt
1 cup unsalted butter, softened
1- 1.25 cup sugar
1 egg, beaten
1 tablespoon milk
1 tsp vanilla
1/4 tsp ground nutmeg
Powdered sugar, for rolling out dough

Cinnamon sugar or colored sugar for sprinkling on top, optional

Sift together flour, baking powder, nutmeg and salt. Set aside. Place butter and sugar in large bowl of electric stand mixer and beat until light in color. Add egg, vanilla and milk and beat to combine. Put mixer on low speed, gradually add flour, and beat until mixture pulls away from the side of the bowl. Divide the dough in half, wrap in waxed paper, and refrigerate for 2 hours.

Preheat oven to 375 degrees F. Sprinkle surface where you will roll out dough with powdered sugar. Remove 1 wrapped pack of dough from refrigerator at a time, sprinkle rolling pin with powdered sugar, and roll out dough to 1/4-inch thick. Cut into desired shape, place on baking sheet lined with parchment, or silicone baking mat. Sprinkle cinnamon or colored sugar on top or leave it plain. Bake for 7 to 9 minutes or until cookies are just beginning to turn brown around the edges. Let sit on baking sheet for 2 minutes after removal from oven and then move to complete cooling on wire rack.

Tuesday, November 01, 2005

Happy Diwali!


courtesy: 123greetings.com

This is the first Diwali that this blog is celebrating. Diwali, especially the first (thalai) Diwali is a very special occasion. A baby's first diwali, a newly wed couple's first Diwali, first Diwali in a newly bought house and even this blog's first has a special significance.

Dear readers, Happy Diwali to you. My best wishes to those bloggers, who are celebrating their 'thalai' diwali in blogging.

Monday, October 31, 2005

Paal Khoa- The microwave way


Diwali is tomorrow. So I kicked off the cooking routine for the festival today without the use of the stove. Paal khoa is milk that has been thickened with sugar and cardamom to a paste-like consistency. I still cannot forget the taste of delicious Aavin paal khoa. Making it requires patience and time. You boil the milk and simmer, it stirring all the time until it is thickened. One of our friends has arranged for a party to exchange sweets and snacks. When it comes to large-scale khoa-making, IT IS a lot of effort. So I thought I had nothing to lose when it came to try it the microwave way. Instead of condensing the milk, on the stove, a can of condensed milk goes into this. In just 6 minutes, you have a delicious paal khoa. The only work that is needed is stirring the mass every 2 minutes or so.

Although this is eaten with a spoon, I made it into small pedas for the guests to eat as a finger food. This makes about 20-25 small pieces.

Microwave paal khoa or peda

3 Cups Milk powder (non-fat is ok)
1 Can Sweetened Condensed Milk
1/2 Stick unsalted butter
pinch saffron (optional)
1/2 tsp Cardamom powder
Chopped pistachios

Melt the butter in the microwave in a microwable casserole with a lid. Add milk powder, condensed milk, and saffron. Mix well. Close the lid, microwave for 2 minutes. Remove, and stir. Add ground cardamom and mix.

Keep repeating for every 2 minutes (total around 6 minutes), until the color changes from yellow to light brown. Let them cool to luke warm. Make them into balls, and shape them to pedas. Or you can serve it like a halwa. Decorate with chopped pistachios.

Saturday, October 29, 2005

A new set of books


I happened to find some great used books at Powells.com. I received my order of seven great books last week. Total cost, only $53.00. Check them out for some great deals.

Friday, October 28, 2005

Cooking with soy meats- Portugese Kale soup


I am an occasional chickenitarian in an otherwise vegetarian family. My husband got converted into a lacto-ovo vegetarianism more than ten years ago. But the soy meats that have flooded the market are a boon for families that have members who are mainly vegetarian. Also, eating lentils and beans as a source of protein can sometimes be boring. I like to use soy chicken, pepperoni and bacon and love their texture and smoky flavor they give to dishes. Even though I have not tasted real pepperoni, I love the soy pepperoni on pizzas. The soy chicken has a sort of meaty flavor and texture. I use it Indian chicken curries.

Recently, I saw a soy chorizo at Super Walmart and instantly, remembered about Rachel Ray's kale-chorizo soup that has been much raved about at the forums. Kale is a green that has so much nutrition but it is very underused in our household since it is rather tough and bitter.

The soup was delicious with a smoky flavor. I used white beans and vegetable broth instead of garbanzo beans and chicken broth. Kale does not become too soft like other greens and it has a bite to it without any bitterness. It is a filling and comforting meal by itself.

Thursday, October 27, 2005

Banana pepper sabzi


Every cook has his/her cooking style. I prefer to follow recipes closely but my mom is totally different. She always adds some of her favorite ingredients to all the recipes giving them her unique touch. Some of her favorite ingredients are puffed channa dal, besan and garlic. She made up this recipe several years ago and this has become a family favorite. In India, we use long, mild peppers that are fried in bajjis. The spice mix is a traditional tamilian powder that is used to stuff baby eggplants and peppers. Since banana peppers are used, they are quite spicy. I have also used Anaheim peppers for a milder dish.

Banana pepper sabzi

6 banana peppers, stems removed, seeds and membrane removed and cut into 1 inch pieces
1 tsp urad dal
1/2 tsp mustard seeds
1/2 tsp cumin seeds
salt to taste
1/2 tsp oil

Spice mix

3 tsp coriander seeds
1.5 tsp urad dal
1.5 tsp chana dal
1 tsp puffed chana
3 dry red chilies (you can reduce this if you want a mild version)
1 T dessicated coconut
1/4 tsp salt
1/4 tsp oil

For spice mix: Heat 1/4 tsp oil and add all the ingredients except salt and coconut. Saute until dark golden brown. Add coconut and turn off heat. Grind into a coarse powder along with salt. This can be used as a stuffing or as a seasoning.

Sabzi: Heat oil and add urad dal, cumin and mustard seeds. After seeds splutter, add the chopped peppers and some salt. Sprinkle some water, cover tightly and cook until almost done. Remove cover and add 1-2 Tbsp of the spice mix and saute until completely dry and spice mix is slightly toasted.


This goes great with soft homestyle dosas and chapatis. Don't forget to have a bowl of yogurt on the side in case you get a fiery pepper.

Tuesday, October 25, 2005

Almond, hazelnut bark


I have been having a big time chocolate tooth since last week (partly, thanks to SHF). When I saw a recipe in Leite's Culinaria for a Pistachio, hazelnut chocolate bark, I decided to try it. I always need a reason to make a particular recipe, it seems. I have never worked with tempered chocolate and this was the reason for choosing to make this one (besides an unused chocolate thermometer). What I was expecting to do was a homemade version of Cadbury's Fruit and nut bar.

The recipe called for 1.5 cups of tempered chocolate and seriously, I do not know how much of chocolate I would need for that. So I used a recipe for Almond bark from Nick Malgieri's Chocolate book.

The result was perfect and would be even better with my favorite milk chocolate.

Almond, hazelnut, pumpkin seed bark

8 oz 60 % bittersweet chocolate (I used Ghiradelli), tempered
8 oz mixed nuts (I used almonds, hazelnuts, pepitas)
Handful of black raisins
A pinch of fleur de sel, for sprinkling on top

Toast nuts separately. Remove skin off the hazelnuts. Chop all the nuts coarsely.

Tempering based on Malgieri's instructions:

1. Melt chocolate over a double boiler or microwave till the temp. rises to between 115 and 200 F.
2. Cool chocolate at room temp, stirring occasionally, until temperature falls to low eighties. When the chocolate satrts to set up around the top edge of the bowl, you can say that the temp is right. I did not use the seeding method here.

3. Keep the chocolate again on top of a double boiler and let temperature rise to between 88-91 F for dark chocolate (or 86-88 F for milk or white chocolate). If the temperature rises to above the given range, you have to start all over again.


Mix some of the nuts and all the raisins into the tempered chocolate. Spread onto a foil-lined baking sheet. Sprinkle remaining nuts and fleur de sel on top. Let set at rom temperature for about 30 min. Break up the set chocolate into large pieces. This keeps well at room temperature in an air-tight container.

Friday, October 21, 2005

SHF #13- Re-engineered Chocolate Decadence


I have been eyeing recipes from Alice Medrich's low-fat bible 'Chocolate and the art of low-fat desserts' and Lovescool has given me a great excuse to make a recipe from it giving us a dark and desirable theme. This is my first experience with Ms. Medrich's recipe and whoo hoo, it uses up a lot of bowls and loads of chocolate too. This is the reincarnation of a sinful dessert that used heavy cream, butter, eggs and chocolate as the main ingredients. Sweet!

However this recipe for chocolate decadence is rather toned down with most of the fat coming from the chocolate. I used Scharffen Berger's 70 % bittersweet chocolate. After refrigerating for 24 hours, a piece of the cake was heavenly but it was not overwhelmingly rich as some chocolate desserts are. The cake is supposed to serve 12 (but an 8 inch cake has to be sliced into thin strips, I think, if it has to serve 12). The cake, or dessert is dense, fudgy and moist. There was a mint undertone, that was pleasant. Does Scharffen Berger's chocolate have a minty taste that anyone has noticed? It tasted like an overbaked cheesecake but in a good sense.

The cake is pleasantly bitter but to appease our sweet tooth I served it with caramel sauce and a little whipped cream. Thanks Lovescool for this dark, sinful theme.

Quest's quest for great food

Richard Quest, the business news anchor for CNN Europe, also has his monthly interview show, Quest. In September's Quest, this guy met with great chefs across three continents to find the secret ingredient that keeps them going. The list of great chefs and their success formula can be found here. One of my favorite Indian chefs, Sanjeev Kapoor is also featured in the show.

Friday, October 14, 2005

Bhelpuri


The colorful bhelpuri has a fan following like no other street food in India. It is found as gilla (wet and saucy) and sookha (dry) bhel. Even our part of South India has a drier version. The original Bombay Bhel uses three different chutnies to spice up the otherwise dull puffed rice- sweet date chutney, mint chutney and some garlic chutney. Deccanheffalump has neat recipes for the garlic and date chutnies. The mint chutney is made by grinding equal quantities of mint and cilantro with a small piece of fresh ginger and a few serrano chilies. Squeeze some lemon juice and add salt as needed. Unless you are entertaining a lot of people at home, it is quite uneccessary, not to mention, time-consuming to prepare the three chutneys. Besides, homemade ones do not keep well. If you are interested in trying this spicy snack, a visit to the Indian grocery store should provide you with all the ingredients.

Normally I mix varying amounts of the three chutneys together according to my taste. But it is quite difficult to get the spiciness of the chutneys that a bhel-waalas makes. Besides, the 'ready-made' taste is overwhelming.


During the course of my constant experimentation, I found that this not-so-authentic mix of bhel, chutneys and sauces seem to work well. The taste of my homemade bhelpuri has gone up to a new level.

Bhelpuri (a not-so authentic version)

2 cups of Store-bought bhel mix (consists of toasted puffed rice, sev and potato chips)
1/4 cup of roasted, salted peanuts (optional, but adds a great crunch)
2 medium potatoes, boiled, peeled and cut into large pieces
1 large tomato, finely chopped
1/2 medium onion, finely chopped (I like to leave it out sometimes)
1 small slice of green mango, finely chopped with skin (optional, a nice addition by Chennai bhel-waalas)
2 T finely chopped cilantro
1 slice of lemon

Chutneys:
Mix together 2 T
sweet chutney
, 1 tsp
mint chutney
, 1/4 tsp garlic chutney, 1 T maggi Hot and sweet sauce and 1 tsp of red chili sauce (I used Thai sauce but this is optional), 1/2 tsp chat masala. The sauce should not be very thick but more like a bechamel. I use some water to dilute it. Some lemon juice can be used instead.

Keep the bhel mix in a large mixing bowl. Add potatoes, onion, tomatoes, peanuts, mango and cilantro. Now add just enough chutney to coat the mixture without making it too soggy. Serve immediately with a squeeze of lemon juice.

Tuesday, October 11, 2005

Almond Kheer for the Gods


As a part of Navratri celebration, we make a sweet pudding and a savory snack mix everyday to serve our guests. One important part of all our celebrations is sweet milk puddings called payasam or kheer. Although there are more than a dozen varieties of payasam, almond kheer is very special. Making it is simple but it remains a delicacy in India due to the very high price of almonds. Besides, a generous pinch of the most expensive spice, saffron is also added, giving it is beautiful pale yellow color. Whenever we go to India, one usual request from relatives is to get them a huge packet of almonds (the one sold at Wholesale warehouses). This is an expensive dish to make but it is the best way to savor the delicate taste of almonds and saffron.

Almond Kheer

1 litre or a very generous 4 cups of milk (low-fat also works)
3-4 T milk for grinding almonds
3/4 cup whole almonds, blanched and skins removed
1.5 cups sugar
A very generous pinch of saffron, crushed in a mortar
Sliced almonds and pistachios for garnish

1. Powder almonds coarsely. Add 3-4 T milk and grind to a smooth paste.
2. Bring milk to a boil in a heavy saucepan on medium heat. Add crushed saffron, turn down heat and simmer milk till it is reduced to 3/4 th of the original quantity.
3. Heat a skillet on medium heat. Add almond paste and saute until paste is thickened and you smell a delicious aroma of almonds. Do not let it change color at all. Add sugar and mix until sugar dissolves and the paste become thin. (Some people also skip the sauteeing step and add paste directly to the hot milk. But then you need to boil the milk longer like for 25 min, to cook the almonds. I always had the problem of burnt payasam when I simmer it for such a long duration.)

4. Add the paste to the simmering milk and simmer for 10 min more. Garnish with sliced nuts.

This kheer is best served cold. It is not very sweet like other payasams.

Tuesday, October 04, 2005

The Holy Nine Days


Today is the start of Navaratri- nine days and nights of festivities for us. Prayers are offered to three main Goddesses- Durga, Lakshmi and Saraswathi. It signifies the victory of good over evil. This festival is celebrated throughout India but the form of celebration (and food too) varies. In Tamil Nadu and some southern states, a few odd number of steps are set up and dolls that represent important religious deities are placed on these steps. This is called a "Golu".

This is a festival for the ladies and a celebration of womanhood. We invite people we know to see the arrangement and send them home with special food preparations made for the occasion along with a small bag of gifts.

In most Southern states, Sundal, a snack mix made of lentils or beans is a daily preparation. It is served to the guests and each guest is sent home with sundal packed in pages from the previous day's newspaper. In our family, we do not use onions and garlic on holy days and so most of our sundals have grated coconut to boost flavor. For Day 1, I made a sundal made of channa dal. Nupur has a great chart of the different lentils and beans for reference.

Channa dal sundal

Channa Dhal - 1 cup
Salt - 1/2 tsp
Oil - 1 tsp (I love the taste coconut oil gives)
Mustard Seeds - 1/2 tsp
Urad Dhal - 1/2 tsp
Dry Red Chilly - 2, broken
Green chilies- 2, finely chopped (optional)
1 sprig of curry leaves

Clean the channa dal and soak in warm water for 10-15 min. Cook with enough water (with a pinch of turmeric added) to submerge lentils. When the dal is almost cooked add about 3/4 tsp salt. Continue to cook until completely tender but not mushy. Try not to over cook. Decant the excess water completely and set aside for a couple of minutes. Heat up the oil and fry the mustard seeds, urad dhal and chilly. When the mustard splutters, add the green chilies and curry leaves. Add the cooked dhal and 1/2 tsp salt (the salt added earlier would have been decanted off with the water) and stir for a few minutes. If interested, you may add a handful of grated coconut (I always do it).

This is a protein-rich snack especially for vegetarians and is very portable.

Friday, September 30, 2005

23/5 meme and a recipe


Tanvi of From the Pantry has tagged me for this funny meme that tests your counting skills.

Here is how you do it:
1. Delve into your blog archive.
2. Find your 23rd post (or closest to).
3. Find the fifth sentence (or closest to).
4. Post the text of the sentence in your blog along with these instructions. Ponder it for meaning, subtext or hidden agendas...
5. Tag five people to do the same.

My 23rd post was about a healthy Banana bread that I saw on Debbie's blog, a truly popular recipe from Epicurious.

The fifth sentence was: My only substitution was almonds for the pecans and also adding a little cinnamon as I always do in banana breads.

The fifth sentence is rather out of context. But do I still have the same opinion- YES! Cinnamon in any baked sweet treat is one of my famous additions. My hubby holds the opinion that if any goodie I make tastes off, I must have overdone the cinnamon.

I have been reading this meme on so many blogs now. I don't know if some have already been tagged and yet to post. So anyone who wants to write about their 23rd post is welcome to do so. Consider yourself tagged!

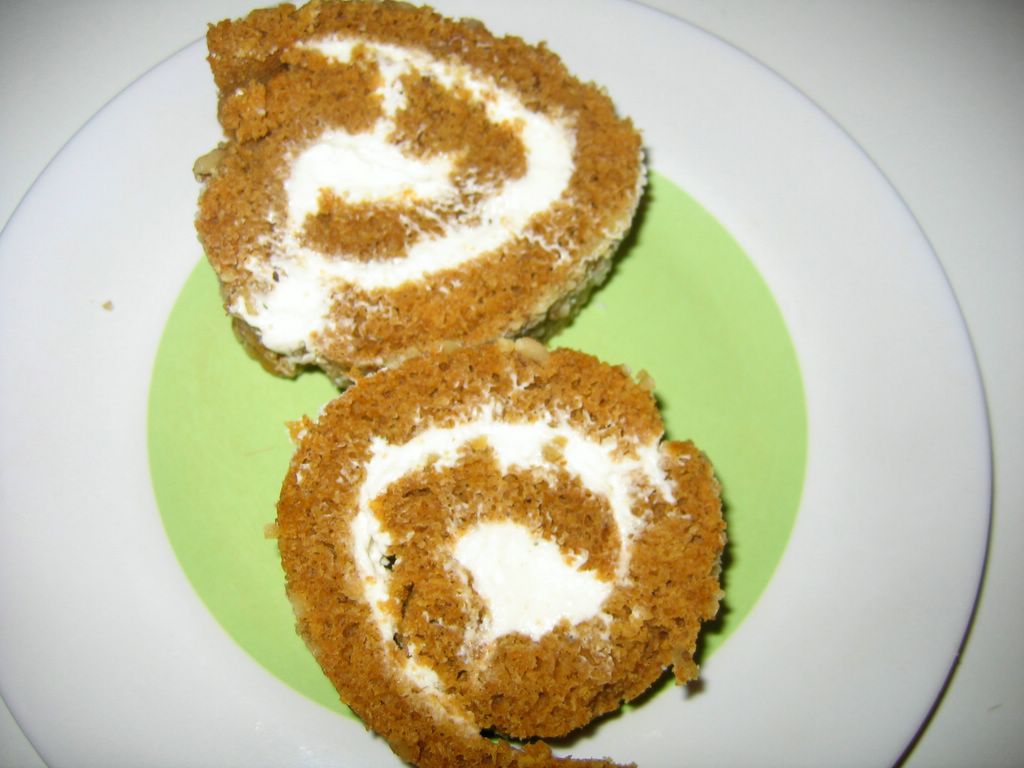
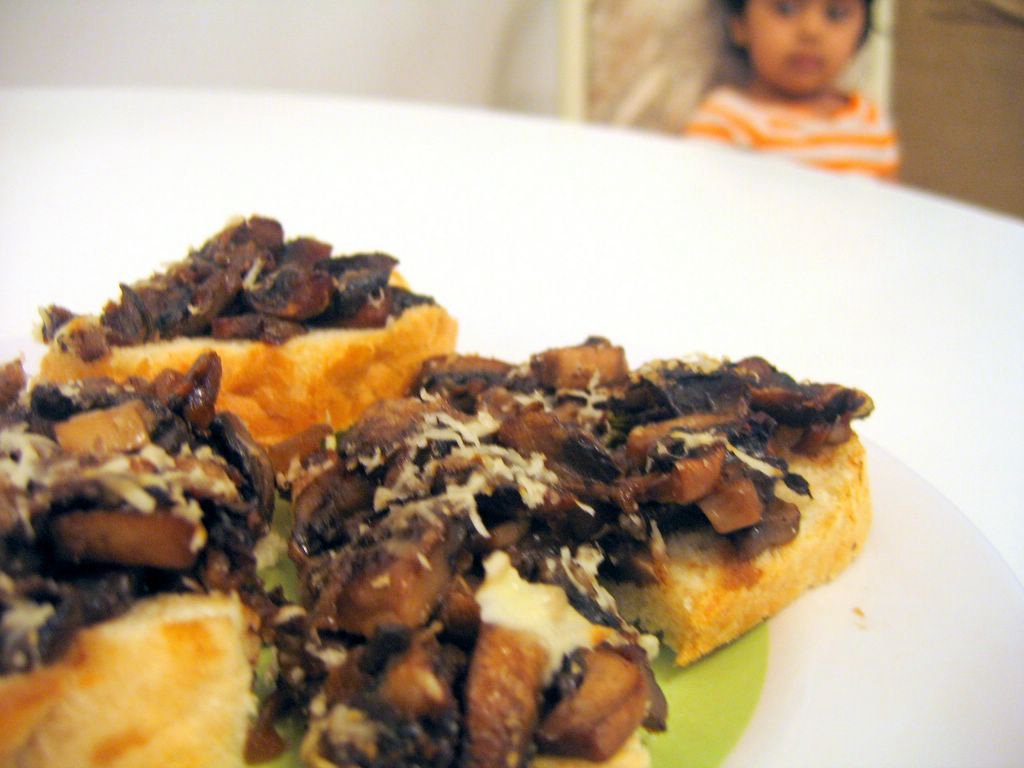
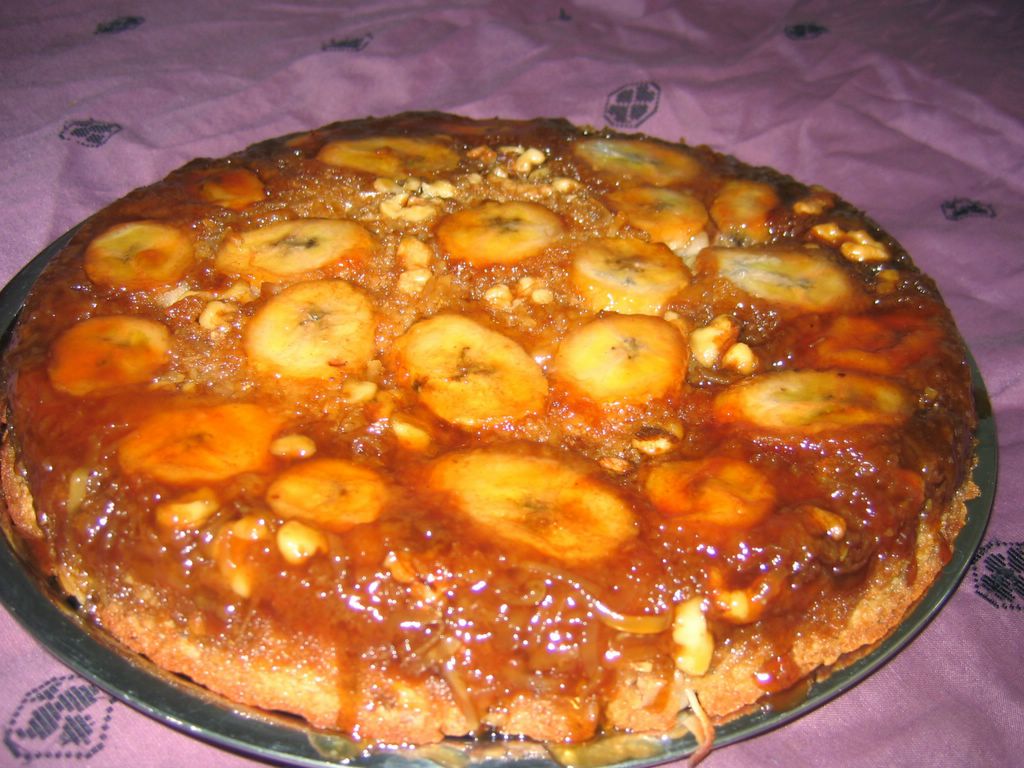
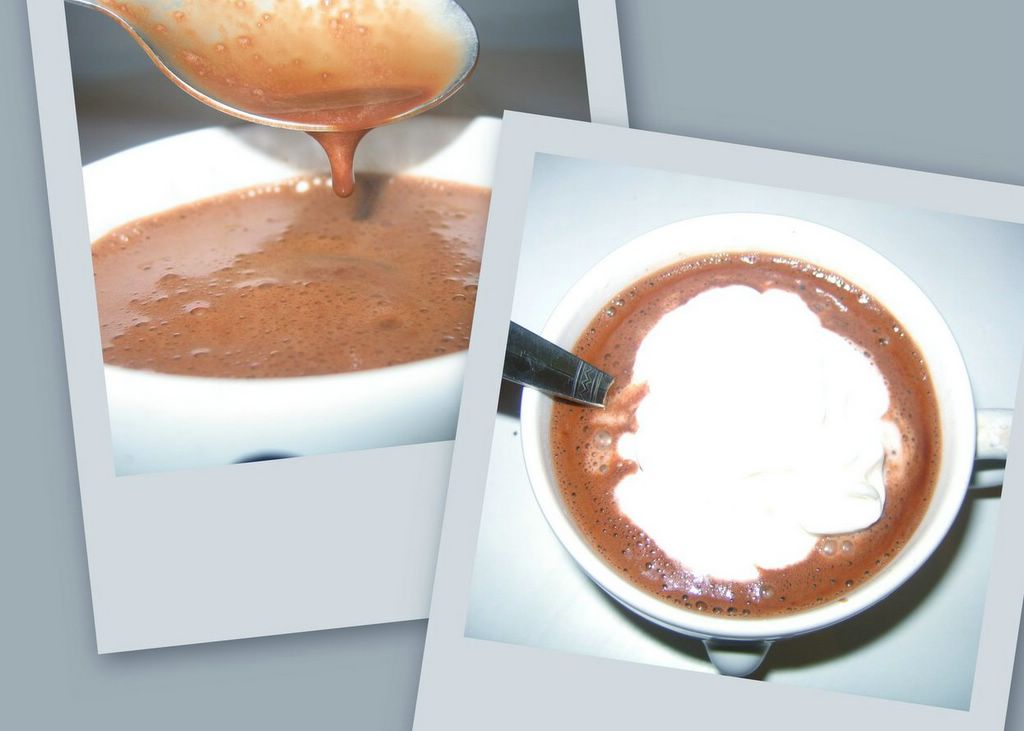
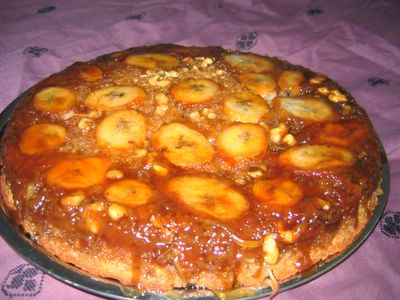
Speaking of banana bread, I had too many over-ripe bananas (as always) and some chocolate sauce (or rather cold hot chocolate, from previous post). So I made some light banana upside down cake combining two recipes. The basic cake recipe is from Cooking Light.

Banana upside down cake

Topping:
2 tablespoons butter
3/4 cup packed brown sugar
2-3 large bananas, sliced 1/2 inch thick
1/2 cup toasted, chopped walnuts
1/2- 1 cup flaked sweetened coconut

Cake:
1 cup all-purpose flour
1/2 cup granulated sugar
1 teaspoon baking powder
1/2 teaspoon baking soda
1/2 teaspoon ground cinnamon
1/4 teaspoon salt
1/2 cup mashed ripe banana (about 1 banana)
1/2 cup any fruit juice or water (I used Pineapple)
1 tsp vanilla
2 tablespoons vegetable oil
1 large egg (or egg substitute)

Preheat oven to 350°.
Melt butter in a 9-inch cast-iron skillet; sprinkle evenly with brown sugar and mix until smooth. Place banana slices on top. Sprinkle the walnuts evenly. Next, sprinkle evenly with coconut. Set aside.

Lightly spoon flour into a dry measuring cup, and level with a knife. Combine flour, sugar, baking powder, baking soda, cinnamon and salt in a large bowl. Combine reserved juice, banana, oil, vanilla and egg, stirring with a whisk. Add banana-juice mixture to flour mixture, stirring until just combined. Pour flour mixture over banana slices in skillet. Bake at 350° for 20 minutes or until a wooden pick inserted in center comes out clean. Cool for 10 min. Invert onto a wire rack. Serve warm or at room temperature with or without chocolate sauce.

The butterscotchy flavor of the topping makes this cake taste quite rich. Try it and you won't be sorry.

Thursday, September 29, 2005

Chocolate on the brain


I have been reading Chocolate desserts by Pierre Herme. Most of the recipes are above my baking skills. But the book has at least five different hot chocolate recipes. I won't give excuses for making this one- no cold weather, feeling blue etc. I was enamored by the photograph of the classic hot chocolate. It just involves heating 1/2 cup water and 1/4 cup sugar until sugar melts, adding 1/4 cup Dutch cocoa and 4.5 oz melted bittersweet chocolate and heating the mixture till a single bubble pops. I used 60 % bittersweet ghiradelli chocolate chips. After everything was done as stated and whipped for 1 min, I had beautiful chocolate lava that could easily pass as a sauce. This recipe makes two servings.

Since I am still a milk chocolate person, I topped it with some whipped cream. Pity that this recipe requires 3-4 bowls, a whisk and a blender. Despite the addition of whipped cream, this was too choclatey for me. By a couple of sips, I was done. If you are one of those, who love dark chocolate and freak out at the thought of drinking molten chocolate, please try this recipe. Otherwise, stay away.

Monday, September 26, 2005

Greens gone sour

I bought too many vegetables at the Indian grocers' last weekend. One of the lot was Gongura or sour greens. These greens with their hard, red stalks are a speciality from the South-eastern state of India- Andhra Pradesh. True to their name, they have a sourness that do not go away when cooked. My mom introduced gongura to me- she makes the traditional gongura chutney that is intensely hot and it goes well when mixed with rice and ghee. I wanted to make this chutney but due to my cramped vegetable drawer, the greens had lost their sheen and their leaves had gone brown. I salvaged about a cup of the leaves. What to do with so little? So I searched some of the Andhra blogs like Mahanandi, My cuisine and Passages for a new gongura recipe. But I found one for gongura dal elsewhere and here is how it goes:

Dal with sour greens

3/4 cup pigeon peas, cooked
2 handfuls Gongura leaves, coarsely chopped
4 Green chillies, chopped
1 medium onion, diced
4 cloves garlic, sliced
pinch of Turmeric
1 small tomato, chopped
1 tsp cayenne
Salt to taste

Tempering:-

1/2 tsp each Mustard seeds,cummin, urad dal, 2 red chillies(broken),Asafoetida,curryleaves

Make tempering with the given ingredients using 1 tsp oil/ghee,add green chillies, onion,garlic and fry till they get pinkish brown. Add gongura leaves(chopped) and cook, covered for 2 minutes. Now add tomatoes, cayenne, turmeric and salt. Saute for another minute. Add the cooked dal and enough water to make the dal as thin as you like. Simmer for 3 min or so. Serve with rice or roti. This dal is hot and spicy. But you can always reduce the cayenne.

Friday, September 23, 2005

'Gimme some sugar' cream Pie


Don't be put-off by the unphotogenic pie. It is nothing short of delectable but yet has a comforting, home-made quality. I was not a fan of custard-like cream pies until I ate a piece of this. Apparently, this is a must-eat in Indiana state. I saw this on Paula Deen's show. She is so adorable that she sold me into making this one. I have never seen a sugar cream pie but I had a small container of heavy cream on hand and a pie shell in the pantry. With their expiry date approaching, I made an off-hand attempt at this pie, preparing myself for an inedible, watery pudding on a soggy crust. I don't know if the apple-pie kinda crust comes in a shell form. The recipes also were not clear enough about the crust. So I used the graham-cracker pie crust but this was the first time ever I have baked that kind. I always thought you can only chill it with the filling. Any sugar cream pie experts who can comment on this?

Hoosier Sugar Cream Pie (adapted a little from Paula's)
1 cup sugar
1/2 cup all-purpose flour, unsifted
1/2 pint (1 cup) whipping cream
3/4 cup milk
1 (9-inch) unbaked pie shell (I used Graham cracker crust!!!)
1 tablespoon butter, cut into small pieces
pinch of salt
1 tsp vanilla
1/2 tsp ground nutmeg

Preheat oven to 450 degrees F.

Combine sugar, flour, cream, salt, vanilla, nutmeg and milk in a mixing bowl. You can also sprinkle the nutmeg on top. But I was afraid of it burning, so I mixed it in. Pour into pie shell that has been placed on a baking sheet. Dot butter bits all around top of pie.
Bake for approximately 15 minutes, and then reduce the heat to 350 degrees F and cook for approximately 30 more minutes. Cool to room temperature and then refrigerate until chilled. Serve chilled.

Anyway, I should have known that one cannot go wrong with milk, cream, sugar with a dash of vanilla and nutmeg. The pie is milky goodness and the top smells and tastes like a sugar cookie. I am not imagining things 'coz of the name, am I?

Tuesday, September 20, 2005

Toasted almond granola bar


I am not a person to eat breakfast religiously each day. It seems like a waste of time to me. I would prefer to eat pancakes, french toast, cereal and all those good things for dinner. The only thing I eat is the grab and go cereal or granola bars. They are small enough to disappear in a few big bites. Or they can be large enough to nibble away slowly while you read the morning newspaper. Best of all, they are healthful snacks too. My favorite is Nature Valley Granola bars but they may be a little too sweet for some people.

With some time to kill and a half empty jar of Trader Joe's Almond butter, I decided to make some granola bar and this recipe from the Almonds are in website helped.

TOASTED ALMOND GRANOLA BARS
1 egg
1/2 cup honey
2/3 cup applesauce
1/2 cup almond butter
1/2 cup firmly packed light brown sugar
1 teaspoon almond extract
3 1/3 cups quick oats
1/4 cup wheat germ
1 cup coarsely chopped almonds, roasted
1/2 cup diced dates
1/2 cup raisins
1/2 tsp cinnamon

Preparation:

I did not have applesauce. So I pressure-cooked diced apples with a little sugar, small amount of water and a stick of cinnamon. I pureed it up with an immersion blender and I had applesauce in 15 min. So that is another pressure-cooker trick for you all, if you are considering investing in one. My daughter enjoyed it as well.

Preheat oven to 350°F. Stir together egg, honey, cooled applesauce, almond butter, brown sugar, and extract in a large mixing bowl. The original recipe called for flax seeds but I used some wheat germ instead. I am sure you can just use oats instead.

Stir in remaining ingredients. Press firmly into a greased 13- by 9- by 2-inch pan. Bake for 20 minutes. Cool and cut into bars.

The recipe does not state anything about baking any further. But the bars were still quite soft and little wet. So after cutting them as desired, I gave them the biscotti treatment. I turned them over and baked them for 15 min or so until slightly colored and dry to touch. This recipe makes about 36 squares.

Saturday, September 17, 2005

Potato, eggplant and okra sabzi

This is my mom's recipe and it is sort of an Indian ratatouille. This is a dish that I never liked as a kid. My mom made this dish with a few leftover potatoes, round Indian eggplant and okra for an end-of-week meal. This left-over connotation put me off. But as an adult, this dish is something that I have started to love because of the different textures and interesting flavors that come together so well. If you do not have the small Indian eggplant, zucchini is a great substitute since it offers the same melting softness. Potatoes are the foundation of this dish and the okra gives a crunchy bite to it while onions and eggplant create a sweet accent.

Potato, eggplant and okra sabzi

2 small potatoes, peeled and cubed
1 onion, minced
4-6 small round Indian eggplant, sliced lengthwise (you should get 8 slices from each)
10 whole okra, sliced into 1/2 inch pieces

1/2 tsp turmeric
1/2 tsp cayenne
1/2 tsp garam masala powder
salt

1/2 tsp mustard seeds
1/2 tsp cumin seeds
1 tsp oil

Heat oil and add cumin and mustard seeds and let splutter. Add onion and saute until soft and starting to brown. Add the potatoes, salt and turmeric along with a sprinkling of water. Saute potatoes alone for 1 min. Now add the eggplant and okra. Also add the cayenne and a generous sprinkle of water. Cover tightly and let the vegetables cook until all the three types of veggies are tender. Now mix in the garam masala and cook uncovered until all the remaining water evaporates. Serve with rotis or rice.

Friday, September 16, 2005

SHF #12- Skillet Apple custard crumble


This month's SHF is hosted by the charming Elise of Simply Recipes. I love to read about the recipes her family loves so much. This month's theme, Custard, is something that I associate with apples and bananas.

Considering how much I love cooked fruit and warm desserts, this recipe caught my fancy. It has a lot of healthful ingredients and I would not complain eating it for breakfast either! I used a basic custard recipe from BBC Food. The crumble topping reminds me of a tasty granola that I bought from a local bread bakery called Loafers. This recipe is a synergistic combination of its parts. Remember people, if you have extra custard left-over after this event, you can easily make this recipe.

Thursday, September 15, 2005

Radish parathas


When we visit Indian restaurants, I always eat parathas. I love this filled flatbread to the extent that I go the extra mile to make them at home. It takes a little more time and planning but it always turns out less greasy and more delicious than what I can get at a restaurant. One advantage of making parathas instead of rotis is that no side-dish is needed. With just a cup of yogurt, the meal is complete. Try it at home and you will like it much more than naan.

Radish or Mooli paratha

Dough:
Whole wheat atta 2 cups
All purpose flour 1/4 cup
oil 1 tsp
lukewarm water as required
salt.
Mix all the ingredients together and knead a smooth dough. rest the dough in a cool place for 30mins min.

Filling:
Making radish parathas is slightly tricky compared to making aloo parathas. Radish has a lot of liquid and if the filling is wet, making these stuffed breads is almost impossible.
You will need,
White radish/mooli 2 peeled and grated
green chillies 3-4 finely chopped.
cumin seeds 1tsp
oil 1tsp
salt
garam masala 1tsp
grated ginger 1tsp
cayenne 1/2 tsp
turmeric 1/2 tsp
cilantro 2 tsp, finely chopped

Put salt in the grated radish and leave it on a strainer for about an hr. The radish will leave lots of water, now place the radish in your hand and try to squeeze out as much liquid as possible. Now take the oil in a saute pan,add jeera seeds. Add grated ginger and green chilies. Next add the radish and saute on medium flame till completely dry. Add cayenne, salt, turmeric and garam masala. Add the chopped cilantro and mix. Let the filling cool completely.

Making parathas: Divide the dough into lemon-sized balls and roll each ball into a round shape. You can proceed in two ways. You can spread a tbsp of filling on the roti and then bring all the corners together and seal them and make a ball again. Roll this ball carefully without putting too much pressure and flatten it into a thick paratha. With radish, this method is tricky and filling comes out a little. Or roll each ball into a circle, spread radish filling and then cover with another rolled out dough and seal the edges nicely and sprinkle a little flour and roll the paratha as thin and round as possible.

Cook on both sides on a medium hot griddle until golden brown. Spread a little ghee or butter on top. Serve piping hot with a bowl of yogurt.