Friday, August 26, 2005

IMBB #18- Let's get frying


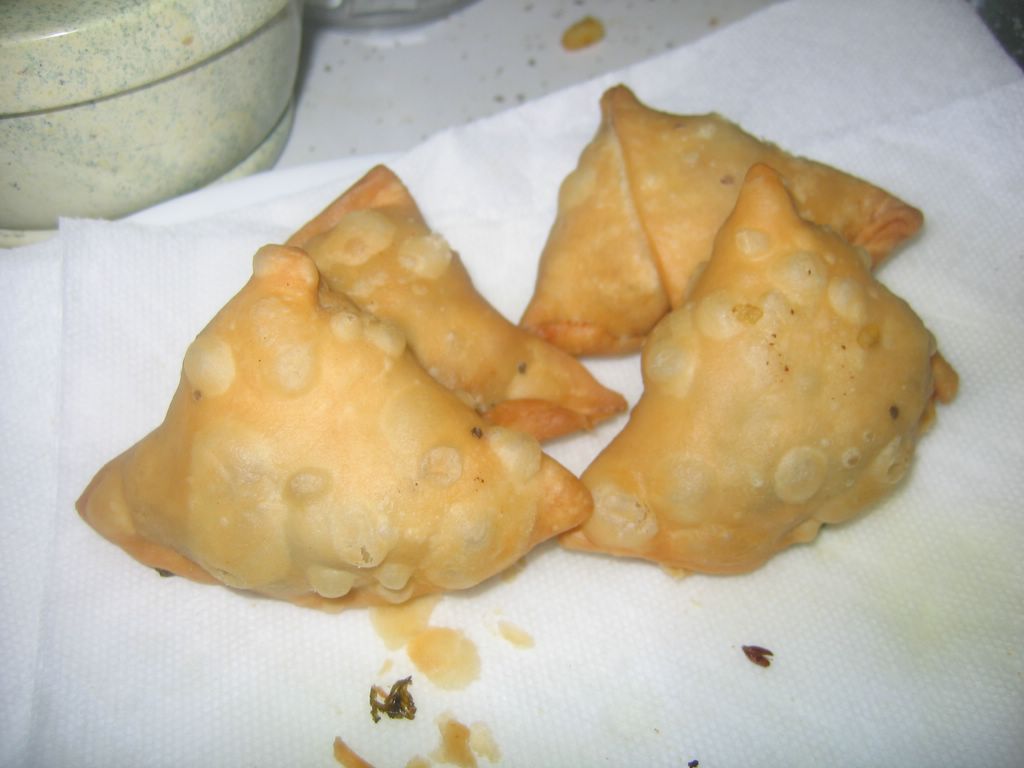
Indians love frying, the bad deep frying, of course. I love this month's IMBB topic hosted by Linda of At our table. It gives me an excuse to make some things I crave for but always seem to resist making them because they are out-of-fashion 'coz they are DEEP-FRIED. Samosas were my all-time favorite snack with tea but the ones available here are those with a leathery sorry-looking skin and a mashed potato filling that lacks the flavor that true Indian samosas have. So before I leave for a short vacation to the Oregon coast, I felt I had to make it and participate in this month's IMBB event with this great theme. So here is my spicy samosa with a crispy shell that stays that way for quite a while. The secret is frying for as much as 5 minutes on medium-low flame.

Sanjeev Kapoor is a famous chef in India and this is from his book. It is the crust that makes or breaks a samosa recipe and his crust comes up to the mark.

Punjabi Samosa (makes about 24 medium samosas)

1 cup all-purpose Flour
3 T oil/ghee
salt

Mix the above ingredients and add water tbsp at a time to make a stiff dough. Knead it until smooth. Keep covered for 10-15 minutes.

Filling:
4 large waxy potatoes, boiled, peeled and mashed
1/2 cup cooked peas, drained well
1 tsp cumin seeds
1 tsp coarsely crushed coriander seeds
1 tsp grated ginger
1 tsp red chili powder
1/2 tsp turmeric
1-2 tsp garam masala
salt
4-5 broken cashewnuts (optional)
1 Tbsp chopped mint (optional)
1 Tbsp chopped cilantro
1 tsp dried mango powder or 1 Tbsp lemon juice
salt (filling should be well-salted)

Oil for deep frying

Heat a tsp of oil. Add cumin seeds and crushed coriander and fry them for 30 sec or so. Add cashewnuts, ginger, mint and green chilies and saute for 1 min. Add mashed potatoes, peas, turmeric, salt, red chili powder and garam masala. Saute for another minute. Finally mix in cilantro and lemon juice or mango powder. Taste for salt before using. Let the filling cool completely.

Divide the dough into 12 pieces. Roll each piece into an oval, the dough being quite thin and pliable. Cut each oval in its diameter. Here is a link with some nice pictures of this complicated procedure. Form triangular pockets with each half, sealing edges well using a little water. Place the traingles in your hand, and open up the pockets and stuff with a tbsp of filling. Seal them up once again with water.

All the samosas can be made before starting the frying process and kept covered under a paper towel. Deep fry in medium hot oil for 5 min or so until a nice golden brown. Serve with green chutney or ketchup.

Wednesday, August 24, 2005

Pasta at last

Things have been hectic at work and so many holy days that seem to be coming every week. So many things cooked but no real posts. There have been several cooking sprees followed by days of lethargy with only rice and vegetables to eat. It surprises me that I never think of pasta for an easy meal. May be it has everything to do with my south Indian upbringing. When a quick meal is required, a hastily made rice, dal and vegetables (thanks to my trusted pressure cooker from India) seems easier to make than pasta. Clearly if only cooking times are considered pasta certainly wins hands down.

Eating rice is becoming very habitual. So to break out from my cooking 'block', I decided to make some pasta from my newly acquired Lidia's family table cookbook. Lidia Bastianich is quite detailed about sauteeing times and cooking times. Her soups sound very warming and interesting in their use of sofrito that is added at the end of the cooking process. But for now here is her recipe for sun-dried tomato and cannellini bean with rigatoni.

Sun-dried tomato and cannellini bean pasta

3 T EVOO
2 T oil from sun-dried tomatoes
4 cloves garlic, sliced
1/2 tsp dried red chili flakes
1.5 cups cooked beans
1 cup sun-dried tomatoes, packed in oil that have been sliced into strips
salt
1 T chopped parsley
grated parmigiano-reggiano
Hot pasta cooking water
1 lb rigatoni

Start cooking pasta. In a skillet, heat both the oils, add garlic and chili flakes and cook until colored lightly. Add the tomato strips and toast for a minute. Pour in 1 cup of pasta water and cook until liquid reduces to half the quantity. Stir in cannelini beans and 1/2 tsp salt and another 1 cup or more pasta water. Bring to a rapid boil for 4 min or so. The sauce would have become sort of thicker 'coz of the beans. Scoop the pasta onto the sauce and saute pasta until done to your liking. Toss in parsley and cheese.

The dish is so flavorful although I added only about 1/2 cup of sun-dried tomatoes to reduce the oiliness. The tender and creamy beans are a great contrast too. According to Lidia, spinach also is a great addition to this sauce.

Tuesday, August 16, 2005

First-ever blog party- Fried Halloumi bites


Another new blog event happening. This time it is an ingenious idea by Stephanie of Dispensing Happiness. Stephanie will be busy plating up finger foods this Thursday. My contribution to her table is Fried Halloumi bites with lime-caper dressing. For those who have not tried the cyprus Halloumi yet, it tastes like a salty, more flavorful paneer. It becomes soft when subjected to any heat treatment but does not become stringy and melted.

Fried Halloumi Cheese with Lime and Caper dressing- A Delia Smith recipe

1 (8.8 oz) pack halloumi cheese

2 tablespoons olive oil
2 level tablespoons well-seasoned flour

For the dressing:

juice and zest 1 lime
1 heaped tablespoon capers, drained
1 tablespoon white wine vinegar
1 clove garlic, finely chopped
1 teaspoon grain mustard
1 level tablespoon chopped fresh coriander leaves
2 tablespoons extra virgin olive oil

salt and freshly milled black pepper

Pat cheese dry with kitchen paper. Then, using a sharp knife, slice it into 8 slices, including the ends. Now prepare the dressing: Mash the capers slightly and mix in all other ingredients together in a small mixing bowl. Go easy on the salt since halloumi is quite salty.

When you're ready to serve the halloumi, heat the oil in a frying pan over a medium heat. When the oil is really hot, press each slice of cheese into seasoned flour to coat it on both sides, then add them to the hot pan and cook 1 min on each side. The color should be a nice golden brown. Serve them straight away on warmed plates with the dressing poured over and garnished with coriander.

They are flavor-packed bites. You can also serve them on pita or grilled polenta squares. Thanks Stephanie for coming up with a wonderful idea. I can't wait to read the round-up of all the appetizers.

Friday, August 12, 2005

SHF # 11- It is kahlua time


When Ronald of Love Sicily introduced coffee as the theme for this SHF, it sure seemed slightly common to me. I add a little espresso powder to most of my chocolate desserts and of course, I make a lot of those. In hind sight, the coffee in many chocolate desserts, only seems to accentuate the chocolate without having a character of its own. Leaving chocolate out entirely by making something like a coffee creme brulee was unthinkable for me. I needed to have chocolate but yet coffee should dominate. So when this recipe caught my eye, with loads of both, I had to go with it. Rachel Ray's recipes don't usually go well with me. But this recipe starts with a chocolate chip cookie mix, I mean, who can go wrong with that.

Kahlua Chocolate Chunk Cookies

1 package dry chocolate chip cookie mix, 1 pound 1 1/2 ounces,
7 tablespoons softened butter
1/4 cup sugar (my addition)
1 large egg, beaten
4 tablespoons Kahlua or other coffee liqueur
3 tablespoons instant espresso or instant coffee crystals
1 tablespoon coarsely ground coffee beans
1 cup bittersweet chocolate chunks
4 ounces walnut pieces

Preheat oven to 375 degrees F.
Place racks in center of oven. In a mixing bowl, cream butter and sugar until smooth. Add the dry chocolate chip cookie mix. Add egg, Kahlua, instant coffee and ground coffee, chocolate chunks and walnuts. Mix well to combine all ingredients into cookie dough. Scoop with a small scoop or by heaping tablespoons and drop cookies 2 inches apart on ungreased nonstick cookie sheet or sheets lined with parchment paper. Bake cookies in batches 9 to 11 minutes or until crisp and browned at edges. Transfer to wire rack to cool and serve.

One of this cookie was enough to leave me with a caffeine coma. But that is probably because I am more of a cafe au lait person and I never have coffee without cream. The kahlua is quite strong (again, I am not an alcohol fan). Definitely, this is an adult cookie and for the faint at heart, it is best served with some vanilla ice cream.

Thursday, August 11, 2005

Childhood foodie memories meme

I have been tagged by Nupur of One Hot Stove to write my five favorite childhood memories. So here they are:

1. Diwali, the festival of lights

It is hard to imagine Diwali being spent anywhere else but in India. The festival is just for a day but we used to spend entire week with much fan fare and a lot of fireworks. It used to be a block party every night of the week culminating in an entire day of food, TV and more fireworks. All the sweets and savory snacks were homemade and my mom, aunts and grandmom spent their week making at least three sweets and three savories that included coconut fudge (burfi), ladoo and gulab jamun, two types of chakli and an Indian trail mix made of fried lentils and peanuts. That was followed by a lot of exchange with friends and relatives. By the end of that week, all of us would end up with a stomach ache associated with over-eating. My grandmother then handed out tablespoonfuls of herbal digestive aid which was also homemade.

2. Making pickles and pappodums

Our house in Madras (now Chennai) had a huge backyard with a wonderful mango tree. Its fruits were such that they were not suited for eating ripe but only when they were green. So there was a lot of achar (pickle) making with the loot since that was the only way they could be enjoyed. Nevertheless the aroma of sesame oil, fresh ground red chilies and spices was so enticing to attract even our friendly neighbors. All were sent home with a jar of pickles while the remainder were stored in the pantry in huge ceramic jars.

South Indians also eat a lot of fried papad like crispies with rice dishes. My grandmom preferred making it herself. A dough was made with different varieties of flour, chilies, lemon and buttermilk. It was pressed with something like a cookie press and sun-dried. All of us kids were involved in helping out and also shooing away birds.

3. Mid-day snack of yogurt and rice

Our traditional Brahmin-style of eating involved an elaborate lunch early in the morning around 10 AM, followed by a snack of idlis, dosas and coffee at 4 PM and a late dinner of rice at 8 PM. As kids, during summer vacation, we were pretty much drained of energy by 1 PM after playing at 110 F for several hours. So one of the ladies in the family mixed yogurt with cold rice and vegetable of the day, rolled them into bite-size morsels and placed it lovingly onto our palms, as we all sat around her and waited for our next bite. Many summers were spent so and still it feels just as good when I get to experience it again.

4. Non-vegetarian for the uninitiated

We are vegetarians by religious standards. But I have to blame my school friends for getting me to try chicken from their lunch box and prepared in a way I would like. I have been a chickenitarian ever since. May be one reason for my enjoying it so much is the way in which it is prepared in India, literally drowned in spices. IMHO, it is the only way I like it (but for the occasional Quaker Lube wings).

5. Hostel lunch of ramen noodles

As an undergrad student living in a dorm, many of our lunches were cooked Top Ramen noodles. We had an electric kettle for hot water and a casserole dish for soaking the noodles. Four packs of noodles were cooked this way and eaten communally from the same casserole by five hungry girls. Even without any vegetables or fancy cutlery, they were delicious. Late in the evening, one of us would venture out to the food cart outside to get some mirchi pakoras or vadas, to be consumed with tea.


Whew, probably this was one of my longest post. But I had a great time thinking about the fun I had as a kid.

Now if you are tagged next, here's what you do: Remove the blog at #1 from the following list and bump every one up one place; add your blog’s name in the #5 spot; link to each of the other blogs for the desired cross-pollination effect.

1. Farmgirl Fare
2. Becks & Posh
3. The Cooks Cottage
4. One Hot Stove
5. The green jackfruit

I know this meme has been going around for a long time. But I would be interested in reading the childhood foodie memories of:
1. Tanvi of From the Pantry
2. Jennifer of Taste everything once
3. Sue of Snackish

Wednesday, August 10, 2005

High school chemistry put to task


(Half-done two toned silver vase with well-polished one in the background)

After experimenting so much with cooking, I decided to use my high school and undergrad chemistry knowledge to clean up some silverware I had. With a religious event coming up this Friday, these items are to be the show-piece and I wanted them spic and span.

Here is how it goes: Line the insides of a non-reactive bowl with some Aluminium foil. Place the tarnished silver (which is apparently silver sulphide)such that the tarnished part touches the foil. Add a generous spoon of baking soda. Pour boiling water on the silver and gather up the foil and close it like a bundle. After a minute or so, you can find your well-polished silver. When you open, you can smell the rotten egg stench of hydrogen sulfide.

Here is an explanation I found on the Internet for the reaction: " The hydrogen gas is evolved through the reaction of aluminum and sodium (bi)carbonate. The hydrogen plays no part in the removal of the silver tarnish (i.e., silver(I) sulfide).

Aluminum is a reducing agent, and thereby reduces silver sulfide to elemental silver while forming aluminum sulfide (which is yellow in color). The aluminum sulfide thus formed readily hydrolyzes to form aluminum hydroxide and hydrogen sulfide.

So, we really have *two* gasses evolved: hydrogen and hydrogen sulfide..."

With such a neat trick that is effortless, brain obviously wins over brawn.

Monday, August 08, 2005

Barefoot with roasted tomato basil soup


Yesterday on a trip to a nearby farm, I purchased 1/2 a peck (!) of tomatoes, which is almost 6 lbs worth. They were big, ripe and juicy and ready to go. After tasting a couple of them raw, I felt that they were too good to be drowned in spices in making my favorite tomato chutney. So the Barefoot contessa's recipe for roasted tomato soup serves the dual-purpose of using up some of the tomatoes and also the wildly overflowing basil in my container garden.

I have made a lot of soup and each time I taste the end product, there seems to be something missing or excessive. The soups I make do not seem to have the delicate quality of the ones in restaurants and cafes. Overpowering flavor is something I dislike in soups and to me that is not comforting. So this time I approached soup-making as an exact science, measured everything from onions to red pepper and made half a batch of this soup. The soup is really delicious and creamy, without any cream in it.


Our vegetarian family needs a lot of carbs and to fill this demand, I also made Barefoot contessa's French Potato salad with some new potatoes. On the whole, a delicious and comforting meal!

Friday, August 05, 2005

Greek stuffed zucchini


During my weekly shopping for vegetables in the Strip district market, I sighted cute baby zucchini at the Pennsylvania Macaroni company, my favorite Italian store around here. All I knew was, I had to stuff these with something. I also remembered seeing Clotilde making something out of it. So I bagged four of these little'uns.

Almost 10 days have passed and I could find time for these only today. One of the zucchinis had become really wrinkled and past its prime. So the recipe is with 3 zucchinis.

Cut off the tops of the zucchini and save them for later. Scoop out the zucchini pulp with a teaspoon or melon baller. Season shells with salt and pepper. Spritz surface with olive oil. Bake the shells in a greased dish at 375 F for 15 min.

Stuffing:

2 medium onions, finely chopped
5 cloves garlic, minced
1/2 tsp dried pepperoncino
pulp of zucchini, finely chopped
1 tomato, seeded and finely chopped
1/2 cup brown rice, cooked
1/4 - 1/2 cup unseasoned bread crumbs
1 T pine nuts
1 T raisins
1/2 tsp fresh oregano, finely chopped
1/2 tsp fresh rosemary, finely chopped
1 T za'atar mix, optional
salt, pepper

2 T feta cheese

olive oil

Heat oil. Add garlic and saute until it colors slightly. Add pepperoncino and onions. Saute until onions color slightly. Add zucchini and fresh herbs. Add salt and pepper. Saute until zucchini softens. Add chopped up tomato and rice and heat them through. Add za'atar, pine nuts and raisins. Turn off stove. When the mixture cools slightly add bread crumbs. Just before stuffing add feta cheese.

Stuff mixture into the zucchini shells and place in the baking dish. Add some olive oil on top. Bake at 375 F for 20 min or until zucchini shells are tender. Serve with some lemon wedges.

This amount of stuffing will be good for six baby zucchinis.

Once these came out of the oven, the smell of za'atar and feta filled the air. Before I remembered to take photos, the little'uns were in our stomachs. And thats always a good thing, right?

Hats off to you cooks out there who always remember to take snaps of delicious things all the time!

Monday, August 01, 2005

Buttermilk pound cake


I have never made a pound cake before, always fearing its richness and also my sweet-loving gluttony. This time I decided to bite the bullet (or should I say butter?) and made this as a something for my friend J whose house I will be paying a visit to. The buttermilk in the recipe makes it so tender with tight crumb. The rift on top is beautiful on the rich brown crust. The taste is very buttery and like shortbread, it is difficult to eat more than a slice in one sitting.

Buttermilk Pound Cake - makes 2 medium loaves

1 cup butter, softened
2 cups sugar
4 eggs
3 cups all-purpose flour
1/2 teaspoon baking soda
1/4 teaspoon salt
1 cup buttermilk
1 tbsp vanilla extract


Cream butter, gradually add sugar, beating at medium speed of an electric mixer until well blended. Add eggs, one at a time, beating after each addition. Add the vanilla and mix in.
Combine flour, soda, and salt; add to creamed mixture alternately with buttermilk, beginning and ending with flour mixture.
Pour into greased and floured loaf pans. Bake at 325 degrees F (163 degrees C) for 1 hour.

It is easy to create variations to this recipe but the basic vanilla version is the best IMHO.